
In addition to running EssayTagger I'm also a high school gymnastics coach. This is totally off-topic for EssayTagger, but I didn't have anywhere else to post it!
 |
| My flares aren't perfect but they are fun! |
The best part is that you can train all this on your own, in the offseason. You can easily get circles in 9 months. It's a lot harder to do it during our 10-week season.
Unfortunately mushrooms are expensive. The type in the picture on the left with a steel base costs about $950. Even the cheapo-looking plastic mushrooms are over $300. Ouch!
 |
| $300+ for this?! |
So I wanted to engineer my own mushroom that would be strong enough to support my 157lbs, it had to be simple enough for my more handy high school gymnasts to build at home, and the raw materials had to be reasonably affordable.
I'm pretty happy with the results:

Tools needed
Drill
7/16" drill bit
1" flat bit
Mitre saw (or do the cuts at a hardware store)
Light duty staple gun
Box cutter
Measuring tape
Sharpie
Materials
25" planter - Costco: $17.99
24" pine round - Lowes: $17.57
3' 3/8" anti-fatigue mat - Lowes: $3.97/ft = $12
Great Stuff Big Gap Filler Insulating Foam Sealant: $5
16x36x3/4 board - $7.78
1yd vinyl fabric remnant - $6
8" carriage bolts, flat washers, lock washers, nuts, wingnuts: ~$9
2x Liquid Nails clear all-purpose glue: $5.94
Krylon indoor/outdoor sealer/primer: $4.10
8' 2x4: $5
4x 24" interlocking kids foam playmat panels: ~$30

I'll go into more detail on the various materials below, but I encourage you to improvise and just use whatever you happen to have on-hand at home or can find at your local hardware store.
The base
I used a big 25" planter from Costco. It looks like wood but it's really just a thick plastic. When it's flipped upside down it makes for a nice wide, sturdy base. It can easily support my full weight and it won't tip over.


The only flaw with this planter is that the bottom has a recessed inner section that ended up creating a bit of a wobble for the mushroom top. I had to grab a scrap 1/2" board to level it off.

I didn't think the plastic would hold up to the pressure of the metal bolts that will hold the whole thing together. So I took a 16x36x3/4" board and cut it down to 16x16" and trimmed the corners so it would fit inside the bottom of the planter.


The mushroom top
I found this awesome 24" pine round with smooth, rounded edges. It's nice enough that you could use it to make a little table. The mushroom padding and dome shape will sit on top of this table top. Definitely the best option if you don't have a band saw that can cut circular sections out of a board. And I think it's shockingly affordable at $17.

Pre-drill the bolt holes
I used 8" carriage bolts (3/8" diameter, 16-thread) to hold the mushroom head to the base. Even though the bolts are 3/8" I used a larger drill bit (7/16) so that the holes would be bigger. Unless you have a drill press, odds are your holes will be slightly askew from vertical. The larger holes give you more of a margin of error when it comes time to assemble everything.
Tip: Insert a bolt after you drill each hole to make sure that everything stays lined up as you drill the next hole.
Tip: Notice the little arrow on the wooden board in the pic below? Mark the board, the planter, and the table top so that you know which bolt holes are supposed to line up.

If you have a 1" flat bit, you can countersink the top of the table top so that the carriage bolt heads can sit flush with the surface. Either way make sure you use a washer between the carriage bolt and the wood.

At this point we can bolt the table top to the base planter. But wait - I found the mushroom top to be a little too low to ground for my taste.
Raise the mushroom top
So I took some 2x4s that I had lying around and cut them with a mitre saw to form an "X" base to go under the table top. I angle cut the bottom pieces just to be fancy. It's easy on the mitre saw, so why not?! You could probably nail everything together, but I tend to use screws to make sure everything stays locked in place. Obviously check your nail or screw length to make sure you won't puncture the top of the table top.

The assembly is now starting to take shape. Notice that the 2x4s were measured to be just wider than the planter's bottom diameter to ensure edge-to-edge contact and maximize downward pressure transfer. You can also see how the extra 1/2" spacer board in the planter's recessed center is leveling things out for the 2x4s.

I wanted to lock off the carriage bolts directly underneath the table top. But the bolts I used weren't threaded for the two inches or so closest to the bolt head. So I had to add an extra spacer block. These triangle pieces are actually the leftovers from the board that I trimmed to fit inside the planter.

The bolts are locked in with a flat washer, locking washer, and nut.

Then I used washers and wingnuts to complete the assembly inside the planter. If you zoom in, you'll also notice that I used two screws to fix this inside board to the 1/2" spacer board on the opposite side of the planter. This keeps both boards in place so neither can fall off or shift around.

I'm using wingnuts because the full assembly won't fit in my car! This way I can just loosen the wingnuts and disassemble the two major pieces of the mushroom for transport.
Shaping the dome
At first I wasn't sure that the dome shape of a typical mushroom really mattered. Turns out the dome is pretty dang important. It's just too hard on your wrists if you use a flat table top surface, even if it's padded.
Shaping the dome is the hardest part. A friend of mine is experimenting with using his fire pit as a cast for a cement pour. I've been experimenting with these 24" interlocking foam playmats. The EVA foam playmats are surprisingly rigid and hold their shape very well under pressure. But so far they're proving to still be a little too soft. Circles are a lot harder when your palms sink into the mushroom surface. So consider this part a work-in-progress.
I ended up cutting the playmats into concentric circles, stepping the diameters down about 1.5" for each level.
 |
| It's pretty easy to devise a circle-drawing tool! |
 |
| You can cut multiple smaller circles from a single mat |
At first I tried using the mat's interlocking tabs to use them to ease the transitions between each level. It ends up looking like some horrible sombrero or a crazy cookie.


I glued everything into place using two tubes of clear Liquid Nails ($3.97 x2). Maybe I used too much glue or maybe they should stock bigger tube sizes! 2.5oz was not cutting it!
Tip: Before you glue, drill a hole through the center of each layer and the tabletop so that you can line them all up using a bolt or a pencil or whatever.
Results... meh
 I tried a few different things, including a cardboard top layer. It did actually help, but not enough.
And the dome itself was just too shallow. The outside 6-8" of the rim need a steeper, stiffer dome slope.
Version 2
So instead I altered the dome top and incorporated two old lids that I had sitting around my garage. Then I began filling in the gaps using a Great Stuff spray foam that I saw in this DIY mushroom.


I removed the interlocking bits from the edges because they just added too much softness. The blue lid was recessed into two layers of matting to add stiffness without sticking up too far. I wish I had a larger lid, though, because the most important areas are right around the yellow and blue mat rings; that's where your palms will be landing most of the time and that's where you want the most support.
The spray foam takes a while to get the hang of. Expect it to be pretty messy and out of control at first. The aerosol is flammable and the foam itself is probably toxic. Spray in a well-ventilated garage or outside, wear goggles and gloves!
 |
| Now it looks like a giant cupcake! |
The spray foam turns into a slightly spongy styrofoam-like solid within a few hours. It's surprisingly rigid. Shape the dome by carving away the spray foam with a serrated bread knife. I intentionally left the foam layer pretty thick; I didn't want that hard plastic lid poking through to the surface and I wanted to keep the outside rim fairly steep to give my wrists a slightly more neutral landing position. It's starting to look pretty good!
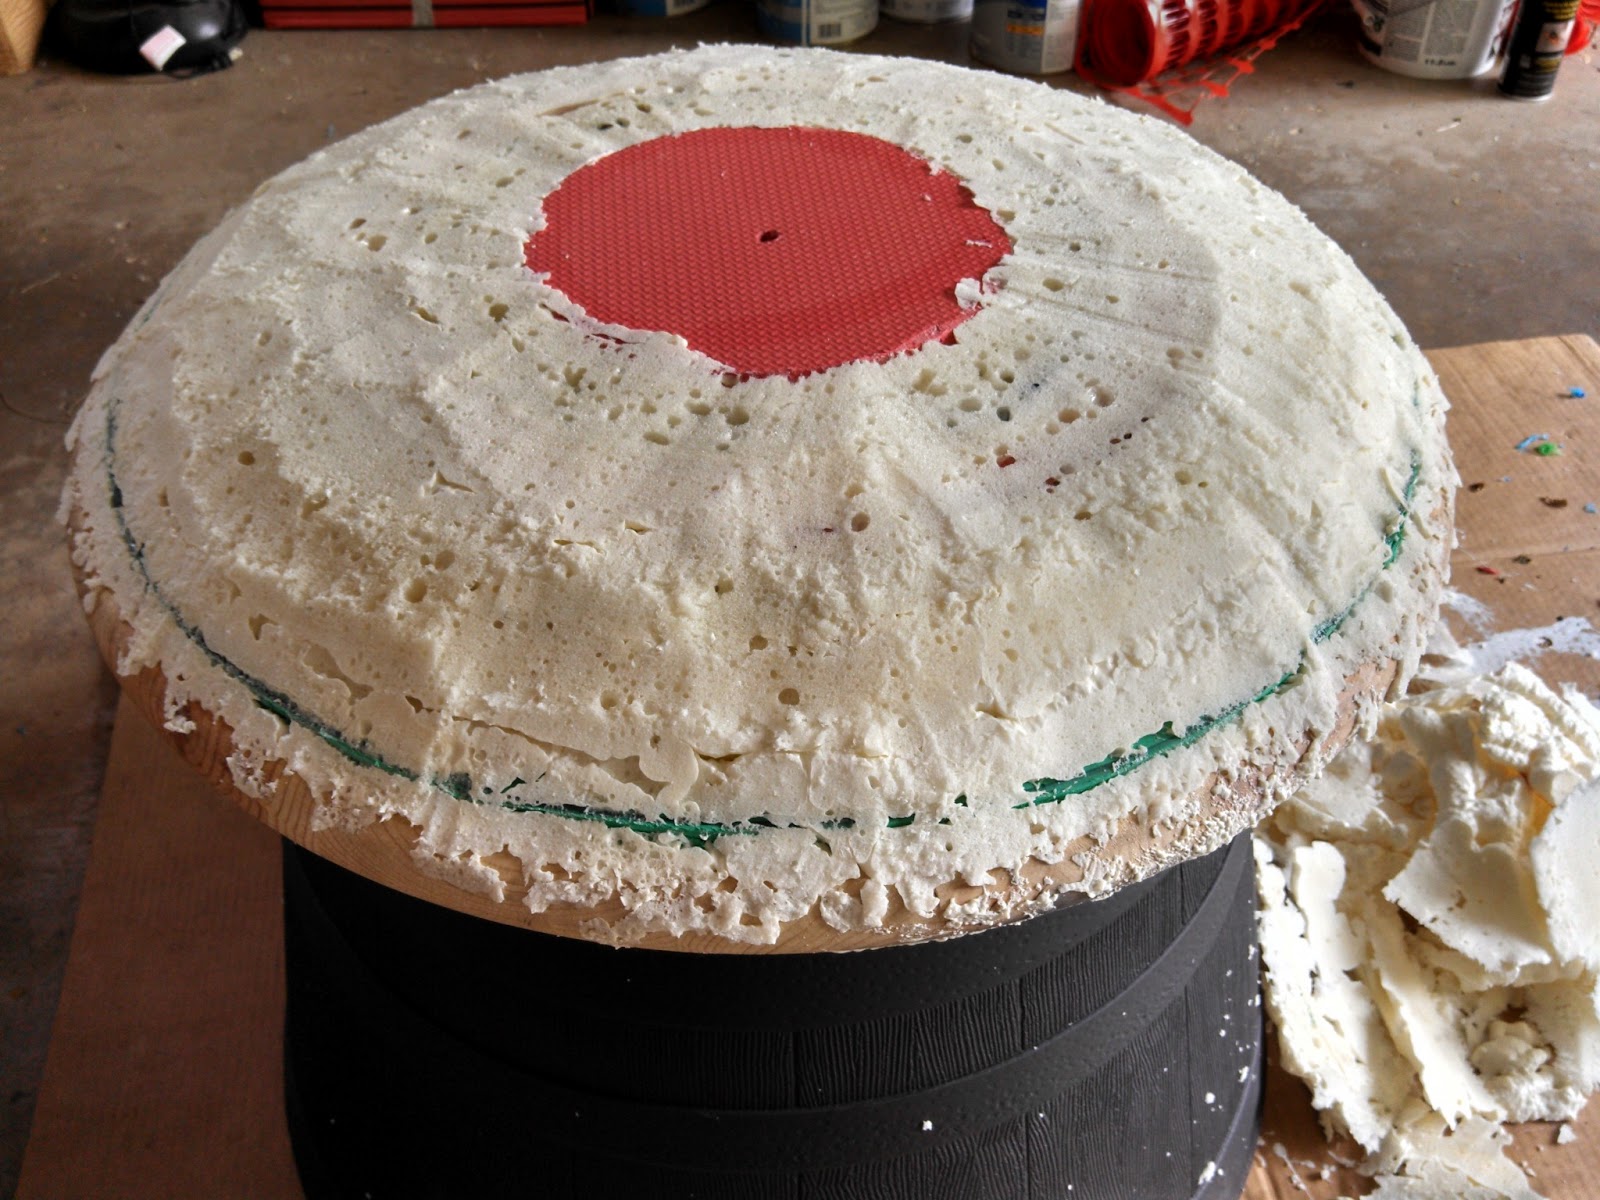
But carving it down revealed numerous air gaps that left soft pockets (see the 4 o'clock position just outside of the top red circle in the pic above). Poke your way into those pockets and hit them with more spray foam. Let it bubble up and cure, then carve it back down as needed.
Tip: Your spray foam straw will get clogged at the end after you use it. Razor off the last inch or so of the straw before trying a second round with the same can.
Then I finished it off with a 3/8" anti-fatigue mat. This mat is a little too soft, but it does help to mask any surface irregularities in the spray foam.

Still brainstorming...
A thinner mat that is more rigid with less sponginess would be ideal, but I haven't been able to find anything that fits the bill and isn't too expensive.
The plastic mats you put under an office chair would be good, but I'm not paying $60 for a sheet of plastic!
Pondering a cloth mache approach using wood glue and either canvas, burlap, or perhaps even fiberglass cloth. I'd layer 24"x4" strips directly onto the spray foam. Worried that it'll end up being too brittle, though.
Optional: paint the assembly
My spare 2x4s were chemically-treated outdoor lumber that you don't want off-gassing indoors. So I applied a Krylon indoor/outdoor sealer/primer spray paint to hopefully seal in the chemical nastiness. I also didn't like the faux-wood look of the Costco planter. So both were spray painted black. It took the entire spray paint can to thoroughly cover the 2x4s and the whole exterior of the big planter.
Just be sure to protect the threads of the bolts so they don't get gummed up. And definitely spray outdoors. Spray paint smells incredibly toxic.

Mushroom cover
Fabric stores have tons of remnants that they price super-cheap to just get rid of them. A vinyl fabric will get you close enough to the feel of a leather mushroom top. I found my vinyl remnant for $6 for a yard.
The vinyl has a stretch to it that allows you to get a nice tight, fitted covering. You just stretch it over and staple it down. I bought a $12 light duty staple gun and it was more than capable of doing the job.


Note: There were a number of vinyl fabric options. I avoided the completely smooth ones because I thought they'd be a bit sticky and gross with sweaty body parts. I opted for this textured one instead. Turns out I should have gone for a smooth/sticky one. This lightly textured fabric is surprisingly slippery and it makes circles slightly harder than they need to be.
That's it!
Now go swing! My circles aren't great, but you can see that the mushroom is strong and stable enough, even on uneven grass. It's even kind of pretty and impressive-looking!
Total Cost
If you add up all the listed material costs, the project comes in at about $116. That's a bit pricey, even though it's still 1/3 the cost of the cruddy plastic mushrooms.
But odds are you won't need to buy everything for this project. For example, the 24" interlocking kids playmats would cost about $30 new but my sister had four that she was happy to get rid of. Parents are tossing old kids' stuff all the time. Even if you don't have access to used playmats, there are probably cheaper materials out there to use instead.
If you have glue and usable lumber scraps around, you can save another $20.
My actual costs were closer to $85. That's pretty dang cheap, considering that Tiger Paws wrist supports alone cost $57 (which I had to buy so my wrists can take the pounding!).
Happy circling!
Let me know how your build goes and if you have any suggestions or tweaks to add!